Tuesday, 3 April 2012

Mothers Day Cards

Went to see the in-laws last weekend. I think mother-in-law liked her shawl :-) Fab! Mission accomplished!
While I'm here at the in-laws, I've taken the opportunity to photograph the Mothers Day card. Here it is....

I'm rather pleased with how it came out...  (Except that the card seems to have lost a rose in the post!)

Products used:
  • Kanban pearlescent card bought from an art shop in Tunbridge Wells
  • Kaisercraft "Sweet Nothings" stuff from Merly Impressions
    • Papers
    • Paper flowers in honey and dusty pink
    • Pearls in chino
Free Plug
Merly Impressions seems to stock the entire Kaisercraft range, and unlike other websites they seem to have the stuff in stock!  They also show all the coordinating embellishments for the ranges so you know what goes with what.  Very impressed.

You can also see projects on www.kaisercraft.com.au.

Wednesday, 21 March 2012

Mother-In-Law's Mother's Day Gift

I've been off the radar for a bit, kind of lost my crafting mojo for a while there!
This is not really project number 5, I've done little bits and pieces here and there; like making mother's day cards for my mum and mum-in-law.  I made them with Kaisercraft Sweet Nothings and their paper flowers and they turned out great!  Unfortunately I didn't take photos, even though I thought about it!  D'oh!
Anyway, I was a bit stumped as to what to get mother-in-law for Mother's Day.  Whilst perusing Ravelry, I found a shawl pattern I really like...  It's called "French Blue Shawl" by Cristina Mershon who designs the most gorgeous things.
Here is the shawl I made.  The stitches are really simple, but I think the finished result looks far more complex than it really is! I used a cotton yarn so it's nice as a cover-up for spring or summer...
Being blocked...  Pinned out on a towel on the floor and steam  ironed...

Draped over a chair....


I totally love the finished result!  It's really pretty :-)  Took a lot longer than I expected though! It's going to be a belated Mother's Day present unfortunately.
I might even do the pattern again one day!  Hope MIL likes it :-)

My Ravelry project contains all the yarn details and other stuff: http://www.ravelry.com/projects/MarysiaBC/french-blue-shawl

You can buy the pattern book for this project here:

Wednesday, 25 January 2012

rant #1: Bad patterns and lazy designers!

I've been trying to make a birthday present for my dear friend Lizzie.  I want to make some little crochet ballet slippers she can wear around the house.  Nothing too taxing, you might think.
I've been looking around at the free patterns and the ones I could find tend to have really poorly shaped heels.  They have square soles that are just stitched together into a weird point.  Last time I looked, my heels, and those around me, are quite round!  I expect slippers to be round too!  Am I weird?  But these are free patterns, so hey-ho...
I wanted something a bit better, so after much trawling I bought a couple of patterns.  In the photos they look great.  Nice round heels, pretty toes...  In the description it'll tell you that there are several sizes included...  Great!  What you don't get in the description is any information about how the item is actually constructed - obviously because they want you to pay for it...

Case #1: The Boho Ballet Flats
http://www.ravelry.com/patterns/library/boho-ballet-flats
Super cute!
These look lovely in the photo, don't they?
I bought the pattern for US$4.99 and started the project.  The designer has loads of stuff up for sale so I thought the pattern should be OK... Right?  Wrong!
I followed the instructions to make a US size 9 (UK size 7) as I'd guess that's the size of Lizzie's feet give or take a size.  As they're crochet, they should be fairly forgiving.
I checked, and double checked my tension to make sure I got it right.  The first thing that miffed me a bit was the odd way the toe part of the sole was constructed.  It uses double crochet (US) in a semi-circle for the toe, whereas the rest of the sole is single crochet. So the toe is kind of floppy compared with the rest of the sole. OK, fair enough, this woman is in the Guinness Book of Records as the fasted crocheter in the world so I'll go with it....
The way the sizes work in this pattern is that you simply add extra rows to the sole...  Long sole for big feet, short sole for little feet....  OK, doesn't seem right....  I'm still going with it...
I got to the heel part, and that was really nice (if a little small), but I was quite pleased after my previous heel experiences.
I finished two soles.  Then I get to the top part of slipper number 1...  Stitch, stitch, stitch.... Finished!

The resulting slipper looks like a bl**dy hot dog bun!

The toes are exactly the same no matter what size you make. WTF?!  Yes, there is no provision what so ever for the fact that if you have size 7 or 8 feet, you're going to have bigger toes and wider feet than someone who is a size 5.  In fact, the pattern goes from a US size 5 (UK size 3 approx) to a US size 10.5 (UK size 8.5 approx).  How is it possible that one width can possibly cater for all these sizes?  These sizes do not all have the same size toes!
It turns out that the rather nice photo above is also used for the youth size pattern!
How does the designer think this is going to work?  This is someone who writes loads of crochet designs and has hundreds of them up for sale!  Surely, surely, there are other people out there who want to make size 7 slippers!  Do these people not realise how ridiculous the resulting slippers look on normal (to me) sized feet?   Do they not complain?  Why does the designer claim that the pattern works for all these sizes, when to any logical human being it can't possibly!
Banana cover anyone?  And the sole showing the odd toe design...  Bad or what?

I've written to the designer asking for suggestions as to how to adjust the pattern, but why should I have to undo everything I've done just because she can't write a decent pattern?  Surely if you pay for a pattern and follow it to the letter, you should get an acceptable result!
This is just downright lazy and bad!

Case #2:  Crochet Ballet Slippers two patterns kids and adults
http://www.ravelry.com/patterns/library/crochet-ballet-slippers-two-patterns-kids-and-adults
Here they are.....


Maybe not in these colour-ways, but you'd think they look like proper slippers, right?  Wrong!  The soles for these are the same width for all sizes... (just the length of the sole varies)  and again they are the same width front and back....  I am not even going to attempt this one, but I still paid for it!


Is anyone else out there as annoyed as I am by poorly thought out, lazy designs?  Does anyone have a decent pattern for normal-sized feet?  Am I the only person who thinks that a pair of slippers, whether knitted or otherwise, has to be about the same shape and size as a foot to look nice?

Just because something is stretchy and flexible, doesn't mean it shouldn't fit.  Is it just me?

Tuesday, 24 January 2012

Hubby's New Crochet Hat

I finally got really fed up of hubby's ears glowing like red beacons from the cold.  he doesn't wear hats because they itch his head.  Seems he'd rather his ears fell off.  Being the loving wife that I am, I decided to make him a non-itch hat from some very nice yarn.  So off I toddled to trawl t'internet...

Free Plug #1:  I found a yarn by a company called Mirasol.  The manufacture of their yarn supports the communities in the Peruvian highlands.  Please have a look at their website www.mirasolperu.com for more information about the Mirasol Project.  I chose the baby Llama (Mirasol Miski).  I am absolutely delighted with it.  The finished hat is thick, squishy and buttery soft.  (You can check what others think of the yarn here.)

Free Plug #2:  After a bit of research I found a small but interesting web shop run by a lady called Kumiko.  She has Mirasol Miski at the best price I could find, and some interesting looking Japanese yarns which I will try some day.  Her shop is www.cocoonshop.co.uk.  When I ordered my yarn it actually arrived the next day!

Back to the story....
I found a pattern I absolutely love on my favourite site, Ravelry (as usual).  It took me ages to work out how the dang thing works.  It's constructed using a different technique to what I'm used to so until it twigged I was stumped!  I was huffing and puffing away.  Frogging and re-making.  I had to chuck bits of yarn out because I plain wore it out from making and re-making...  I wrote to the author and eventually got a response.  After that it clicked and I was able to follow the pattern!
In the end though, it was worth the effort.  I have never been quite so determined to finish something in my life!
There's a hat in my kitchen, what am I gonna do?

Unblocked - doesn't need it.

Sadly, hubby won't let me take a picture of him modelling it...  Boo!

That yarn is dee-lish...  Hat is sooooo  soft.

Thursday, 19 January 2012

Crochet Squares Hat & Scarf (first ever crochet pattern)

I found an interesting pattern on Ravelry, my favourite site for knitty-crochety things.  This was the inspiration for following a crochet pattern. 
The finished hat and scarf.

The first thing I did was make a practice square out of some aran wool that I have; just to see if I could do it and I could!  Here is the first every square I made from a crochet pattern!
My first every crochet square.  I'm very proud :-)
The yarn the hat and scarf are made of were ordered for a Loom Knit project.  The supplier took bl**dy ages in sending it out (I will not be using them again!).  By the time it arrived, I found the crochet pattern and dicided to use the yarn for that instead.

I really enjoyed making the hat, but got really fed up by the time I got to the scarf because the yarn I used is an utter nightmare for crochet.  It split round my hook on every single stitch!  I was a bit fed up of the colour as well...  So I love the hat, but not sure about the scarf....  It was good practice though!
Scarf being blocked!  I pinned it out on some towels and steamed it.

Close-up of scarf draped over the sofa...  very lilac!
So here you go, another project towards my 52.  Seems like it's turning into 52 crochet project!  LOL :-)

Sunday, 15 January 2012

"Starry Night" Crochet Scarf for Natalie's Birthday

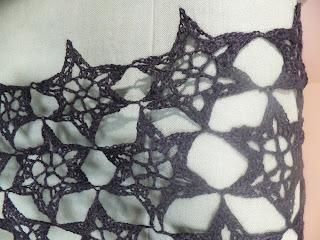
It's my dear friend Natalie's birthday today.  I wanted to make her something but didn't know what.  I came across a lovely pattern in a book I have called Crochet so Fine.  (Details of the pattern and project can be found on my Ravelry project.)
If anyone can tell me why my photos keep coming out sideways, I'll be eternally grateful!
I liked the stars pattern as it's not too boho/girlie for Natalie.  She only ever wears black so I had a slight challenge finding a suitable yarn.  I ended up choosing a lovely soft 4-ply alpaca.  It's made the scarf really airy and light!  It took me ages to make all those stars!  Because the yarn is so soft, the scarf came out all scrunchy when it was finished, so it needed some proper wet blocking.
Natalie's scarf being blocked on a towel on the livingroom floor.
I wet blocked it, and then gave it a good steam after tucking in all the tails (two per star!) and arranging all the stitches neatly.
I am very pleased with the finished item!  It took me two days because I'm slow, but it was worth it.  I really hope Natalie loves this half as much as I loved making it!

The book from which this pattern comes:

Tuesday, 10 January 2012

Loom Knit Slouchy Hat

Hat on a vase in the garden...  Because I can't photograph my own head!

I rotated this photo, but who knows why it insists on coming out sideways.

Close up of the pattern.


I absolutely love my new Loom Knit hat!  It's all warm and snuggly!
I knitted it using Rowan Cocoon yarn in a lovely grey-purple shade called bilberry.  It only took about half the skein, but I added a pompom, so that took up a lot of what was left.

I have decided to share the pattern on Ravelry, so here are the instructions.  All very simple!

Tools
You can use any loom so long as it has pegs in multiples of 8.  I used my Martha Stewart one, set with 48 of the large pegs.  You can adjust the size as you need, but I wanted the hat to come out slouchy, so that's why I made it so big.  The yarn I used is very soft and bouncy do the ribbed band shrinks right down for a cozy fit.  I think if you were to use a stiffer yarn, the hat may come out too big if you use the same loom configuration.

Knowledge Required
There are loads of instructions on the internet to help you if you don't know the basic stitches.  I found watching the videos much easier to follow than trying to fathom out diagrams in books!  I found the videos from GoodKnitKisses on youtube especially clear and helpful.
The stitches you need for the hat are: Knit (u-knit), Purl and e-Wrap.  You will also need to know how to do the gathered bind off technique, and a cast on.
I used the e-wrap knit for the body of the hat as this comes out slightly looser than the "Knit" knit and produces a fuller texture.

Pattern
  1. Cast on the required number of stitches (multiple of 8) in the round.  I used the cable cast on as I find this has the neatest result.  If you can't do this, I would recommend a crochet cast on.  I find the e-wrap cast on method a bit too loopy for my taste.
  2. Create the ribbing by knitting *knit 1, purl 1* repeat for about 8 rows.  Use the u-knit for the ribbed band.
  3. Body of hat:
    1. Rows 1& 2 *e-wrap knit 4, purl 4* repeat to end of row
    2. Rows 3 & 4 *purl4, e-wrap knit 4* repeat to end of row
    3. Repeat steps 3.1 and 3.2 until you reach the desired length of the hat (about 8 inches or so for an adult).
  4. Decrease the stitches as follows (I do this to make the crown of the hat a little less bulky, you can omit this step if you prefer and simply bind off):
    1. Move the stitch from peg 1 to peg 2, knit off.
    2. Move the stitch from peg 3 to peg 4, knit off.
    3. Continue until you are left with every other peg empty, and every other peg with one stitch.
  5. Cut the yarn leaving a 6 inch tail.  Bind off using the gathered method.
  6. Add a pompom if you like.  Some neat instructions can be found here.
The Martha Stewart Loom I used is now available on Amazon!